


Interior removal / update.
Page 1 of 5 • 1, 2, 3, 4, 5 ![]()

Interior removal / update.
![]() by Dinomyte Fri Nov 14, 2014 9:35 am
by Dinomyte Fri Nov 14, 2014 9:35 am
So far I've got seats, door panels and carpet out, but I'm stuck on a couple of little details.
1- do the rear seat belts all need to come out to get the rear seat back out?
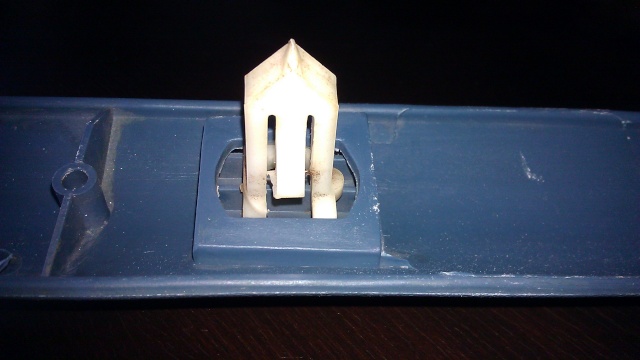
2- I've removed the a-pillar trim, but can't seem to figure out how the piece over the door gets removed. It slides back and forth but I can't get it far enough any-which-way to get it out. I keep thinking I'm going to break it.
Any help as always is greatly appreciated.
Dinomyte- Donating Member

- Street Cred : 11
Re: Interior removal / update.
![]() by Mcarlo77 Fri Nov 14, 2014 9:44 am
by Mcarlo77 Fri Nov 14, 2014 9:44 am
Those plastic trims above the doors are held in by two plastic clips. You're going to break at least one clip when removing them because there is a locking tab that holds it in place. What I do is get my fingers behind them either side of one clip and give a quick pull. Once one is loose, you can rotate the trim piece approx. 90 degrees and remove the trim from the other clip. That clip will remain in place in the roof metal and can be worked free by pressing in on the locking tab while prying out on it. Replacement clips can be had (I'll send a couple if you'd like)...but, take care in supporting the plastic trim best you can when removing so you don't break it.
Last edited by Mcarlo77 on Fri Nov 14, 2014 9:56 am; edited 2 times in total
Mcarlo77- Donating Member
- Street Cred : 77
Re: Interior removal / update.
![]() by 77mali Fri Nov 14, 2014 9:50 am
by 77mali Fri Nov 14, 2014 9:50 am
77mali- Donating Member
- Street Cred : 62
Re: Interior removal / update.
![]() by thatfnthing Fri Nov 14, 2014 10:02 am
by thatfnthing Fri Nov 14, 2014 10:02 am
http://www.ebay.com/itm/1973-1978-Cutlass-Monte-Carlo-Impala-El-Camino-Malibu-Roof-Rail-Headliner-Clips-/111236275156?pt=Motors_Car_Truck_Parts_Accessories&fits=Model%3AMonte+Carlo&hash=item19e632dbd4&vxp=mtr
There's probably some specialty tool that could unlock them, but I wound up breaking mine and replacing them.
If your seat belt retractor mounts are heavily corroded like mine were, you may be better off slicing the back seat straps off with a dremel and resecuring them later with sheet metal screws or something. Once you have those free, the seat back itself shifts upward to unhook it from its retaining tabs.
Last edited by thatfnthing on Fri Nov 14, 2014 10:04 am; edited 1 time in total

thatfnthing- Donating Member
- Street Cred : 65
Re: Interior removal / update.
![]() by Mcarlo77 Fri Nov 14, 2014 10:03 am
by Mcarlo77 Fri Nov 14, 2014 10:03 am
Mcarlo77- Donating Member
- Street Cred : 77
Re: Interior removal / update.
![]() by 77mali Fri Nov 14, 2014 10:27 am
by 77mali Fri Nov 14, 2014 10:27 am
Steve is right, heat would be a good idea if you have a friend to help you out- just be careful of the gas tank & make sure you're safe. The spots that the bolts come out of in the rear seat panel is kind of hard to get at, you might have to raise the car & support it on the rear axle to get decent access to them. Since I stripped mine, I had to get them loose by using the dremmel and making an X pattern, drilling a pilot hole and using a special extraction tool from Craftsmen to remove them. I don't know what those dammed bolts are made of but the are hard as heck to drill into and it took forever to do it, so again be cautious and be patient.
77mali- Donating Member
- Street Cred : 62
Re: Interior removal / update.
![]() by Dinomyte Fri Nov 14, 2014 10:40 am
by Dinomyte Fri Nov 14, 2014 10:40 am
A friend with the torch under the car is the easiest way.
As for the over door trim, I'll try this tonight.
Dinomyte- Donating Member
- Street Cred : 11
Re: Interior removal / update.
![]() by Mcarlo77 Fri Nov 14, 2014 11:29 am
by Mcarlo77 Fri Nov 14, 2014 11:29 am
http://www.ebay.com/itm/1973-1978-Cutlass-Monte-Carlo-Impala-El-Camino-Malibu-Roof-Rail-Headliner-Clips-/111236275156?pt=Motors_Car_Truck_Parts_Accessories&fits=Model%3AMonte+Carlo&hash=item19e632dbd4&vxp=mtr
OMG...$12 apiece?!! I'd better get busy collecting these things.
Mcarlo77- Donating Member
- Street Cred : 77
Re: Interior removal / update.
![]() by Dinomyte Fri Nov 14, 2014 11:57 am
by Dinomyte Fri Nov 14, 2014 11:57 am
Mcarlo77 wrote:thatfnthing wrote:These should be the panel clips you need:
http://www.ebay.com/itm/1973-1978-Cutlass-Monte-Carlo-Impala-El-Camino-Malibu-Roof-Rail-Headliner-Clips-/111236275156?pt=Motors_Car_Truck_Parts_Accessories&fits=Model%3AMonte+Carlo&hash=item19e632dbd4&vxp=mtr
OMG...$12 apiece?!! I'd better get busy collecting these things.
LMAO !!
Dinomyte- Donating Member
- Street Cred : 11
Re: Interior removal / update.
![]() by Hawk03 Fri Nov 14, 2014 12:22 pm
by Hawk03 Fri Nov 14, 2014 12:22 pm
There are other sites you can buy from, just google GM 9617200.

Hawk03- G3GM Enthusiast

- Street Cred : 18
Re: Interior removal / update.
![]() by 77mali Fri Nov 14, 2014 1:01 pm
by 77mali Fri Nov 14, 2014 1:01 pm
77mali- Donating Member
- Street Cred : 62
Re: Interior removal / update.
![]() by Mcarlo77 Fri Nov 14, 2014 1:12 pm
by Mcarlo77 Fri Nov 14, 2014 1:12 pm
Mcarlo77- Donating Member
- Street Cred : 77
Re: Interior removal / update.
![]() by thatfnthing Fri Nov 14, 2014 1:47 pm
by thatfnthing Fri Nov 14, 2014 1:47 pm
thatfnthing- Donating Member
- Street Cred : 65
Re: Interior removal / update.
![]() by Hawk03 Fri Nov 14, 2014 2:32 pm
by Hawk03 Fri Nov 14, 2014 2:32 pm
How many do you need for the interior? Here is 10 for $8.99 with free shipping.
http://www.ebay.com/itm/like/191049466086?lpid=82
Hawk03- G3GM Enthusiast
- Street Cred : 18
Re: Interior removal / update.
![]() by thatfnthing Fri Nov 14, 2014 4:21 pm
by thatfnthing Fri Nov 14, 2014 4:21 pm
thatfnthing- Donating Member
- Street Cred : 65
Re: Interior removal / update.
![]() by Dinomyte Sat Nov 15, 2014 11:22 am
by Dinomyte Sat Nov 15, 2014 11:22 am
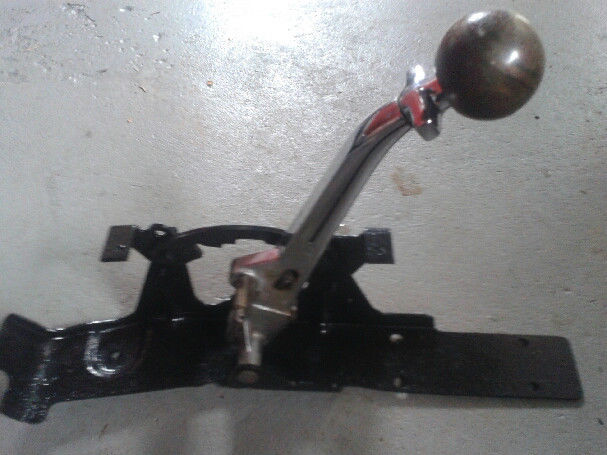 " />
" />From this picture it looks like it will bolt right up, that it was designed/built with the rear bracket as one piece.
Will it operate properly? can I use the cable I have? or is there something more I'll need to do?
thanks
Dinomyte- Donating Member
- Street Cred : 11
Re: Interior removal / update.
![]() by Dinomyte Wed Dec 03, 2014 2:24 pm
by Dinomyte Wed Dec 03, 2014 2:24 pm
I'm sure that the parcel tray is just stuck, weather intentionally or unintentionally, but the other piece looks like it's been purposely permanently attached.
I'll attache a picture later, can't seem to get them off my phone right now.
Dinomyte- Donating Member
- Street Cred : 11
Re: Interior removal / update.
![]() by thatfnthing Wed Dec 03, 2014 3:38 pm
by thatfnthing Wed Dec 03, 2014 3:38 pm
thatfnthing- Donating Member
- Street Cred : 65
Re: Interior removal / update.
![]() by Mcarlo77 Wed Dec 03, 2014 5:15 pm
by Mcarlo77 Wed Dec 03, 2014 5:15 pm
Mcarlo77- Donating Member
- Street Cred : 77
Re: Interior removal / update.
![]() by chevellelaguna Thu Dec 04, 2014 1:43 pm
by chevellelaguna Thu Dec 04, 2014 1:43 pm
chevellelaguna- G3GM Enthusiast
- Street Cred : 16
Re: Interior removal / update.
![]() by impalamonte Thu Dec 04, 2014 3:33 pm
by impalamonte Thu Dec 04, 2014 3:33 pm
impalamonte- G3GM Enthusiast
- Street Cred : 18
Re: Interior removal / update.
![]() by thatfnthing Thu Dec 04, 2014 3:43 pm
by thatfnthing Thu Dec 04, 2014 3:43 pm
thatfnthing- Donating Member
- Street Cred : 65
Re: Interior removal / update.
![]() by dynchel Thu Dec 04, 2014 6:57 pm
by dynchel Thu Dec 04, 2014 6:57 pm

dynchel- Donating Member
- Street Cred : 40
Re: Interior removal / update.
![]() by Dinomyte Thu Dec 04, 2014 7:57 pm
by Dinomyte Thu Dec 04, 2014 7:57 pm
I've got all the interior out of the car except these two pieces. The parcel tray has screws and the rear defogger to remove first, got that. - Thanks thatfinthing.
The other is the piece that is between the two sail panels as chevellelaguna and dynchel both say is structural. I guess I'll be painting it in the car.
Anybody know if SEM paint will work on metal? or am I looking for a colour that's close enough that only I will know?
Dinomyte- Donating Member
- Street Cred : 11
dynchel- Donating Member
- Street Cred : 40
Page 1 of 5 • 1, 2, 3, 4, 5 ![]()


|
|
|
» Pate Swap Meet - Texas Motor Speedway - G3 Parts Goldmine
» '73 Laguna coupe - factory 454- SoCal $2500
» Dash Solutions
» Rusty's progress Done stuff again LOL
» 1973 4 door laguna frame same as 1973 2 door chevelle
» Anyone good at photoshop?
» '77 Monte Carlo Landau - Parting out - 61k miles on car
» Dash assembly for 73-77 Malibu/Monte/El Camino,etc.
» Window louvers