


Vintage Air Retrofit
Page 3 of 4 •  1, 2, 3, 4
 ![]()
Re: Vintage Air Retrofit
![]() by thatfnthing Mon Sep 10, 2012 8:45 pm
by thatfnthing Mon Sep 10, 2012 8:45 pm
Another caveat: while it was extremely handy to be able to use the mockup unit to plan the whole thing, the brackets and mounting holes do not exactly line up on the production unit. Be prepared to enlarge or elongate holes as necessary.
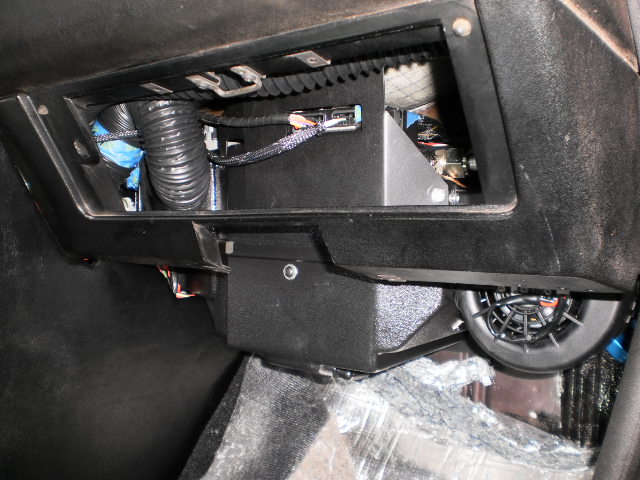
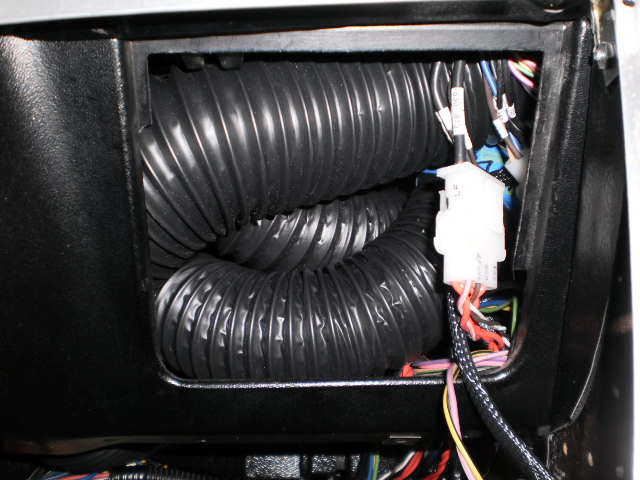
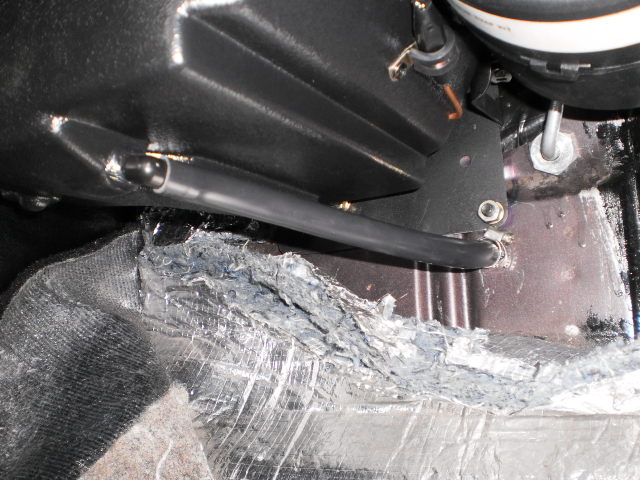
I also got all the duct hoses connected up. I'd like to show a decent photo, but the best I could get of that bundle of snakes was this angle through the old ashtray hole:
I also wrapped up the cabin electrical connections for the system and recalibrated the ECU again for the controls, and made sure the breeze was coming out where it was supposed to when I turned the knobs.
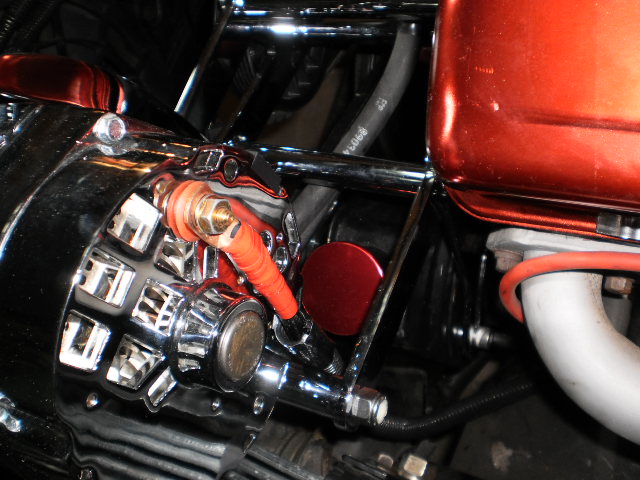
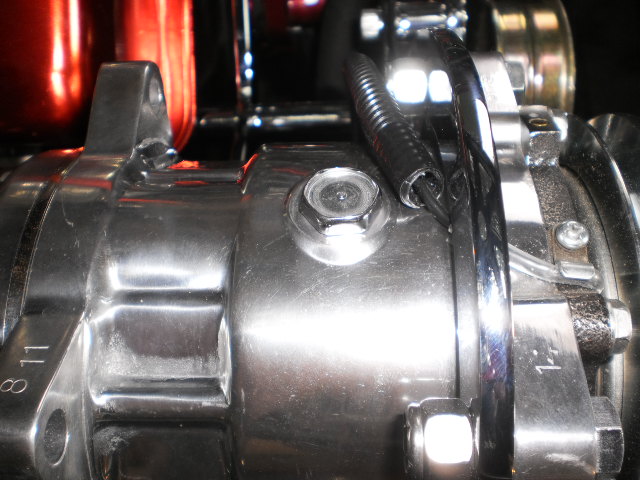
One last thing I wanted to do, though, was install a WOT switch of some sort to disengage the compressor in the event that I might have to put my foot in it. The perfect part for the job is actually the kickdown switch for the TH400 cars:
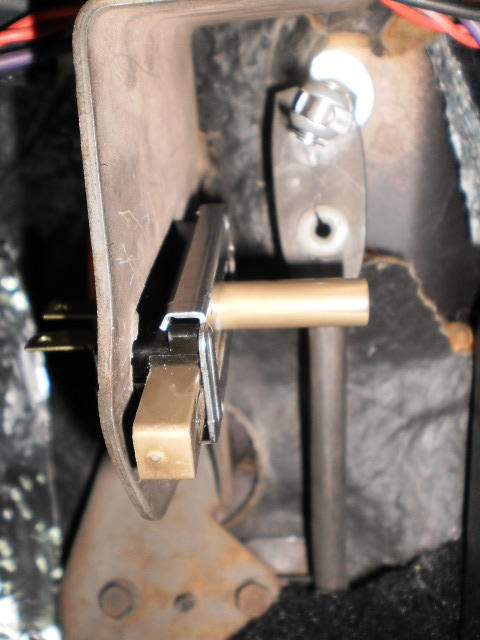
The switch was originally designed to electrically signal the transmission to kick down in the 454 cars, so it mounts in the throttle bracket right in front of the throttle lever, but I simply rewired it to trip a second relay on the compressor circuit to cut power to the compressor.
Getting pretty close now; just waiting on the alt and compressor brackets to come back from the plater...

thatfnthing- Donating Member

- Street Cred : 65
Re: Vintage Air Retrofit
![]() by thatfnthing Wed Sep 26, 2012 9:38 pm
by thatfnthing Wed Sep 26, 2012 9:38 pm
So my next thought was to find someone who could do it for me for a reasonable price. I called about a dozen different metal polishers in the area, and the conversations all went like this:
Me: "I'm looking to get some steel brackets polished for my car. Do you do that?"
Them: "Sorry, we only do commercial work. We recommend you try so-and-so."
Me: "I already spoke to them. They told me to call you."
In the end, I found one company who claimed they would do it, but when I sent him photos of the pieces, he never got back to me.
Then the guy who crimped my hoses suggested chrome plating, and told me of a place that was reasonable and good. So I dropped off all the pieces (including the power steering brackets -- I figured it would look silly if I didn't have them all done the same). Three weeks and $350.00 later, I got these beauties back:

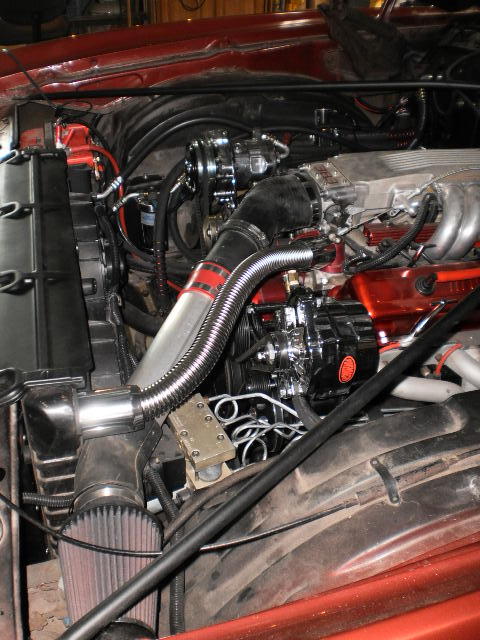
Now I can finally reassemble everything on the motor. I discovered that to avoid fingerprints, wearing soft gloves while cleaning and assembling them worked well. So here are the completed shots of the compressor and alternator mounted and the belts routed:
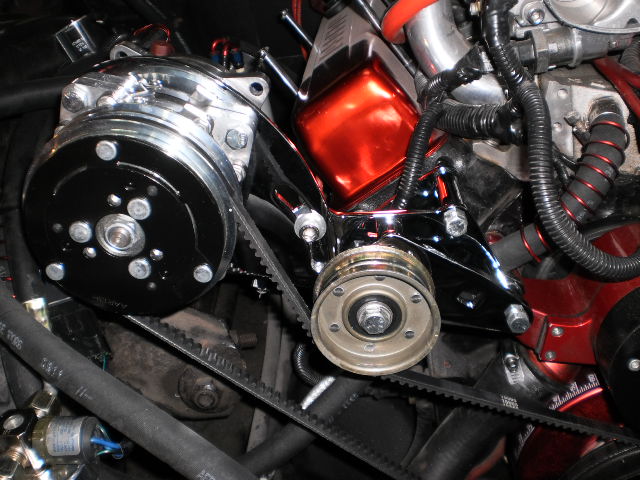
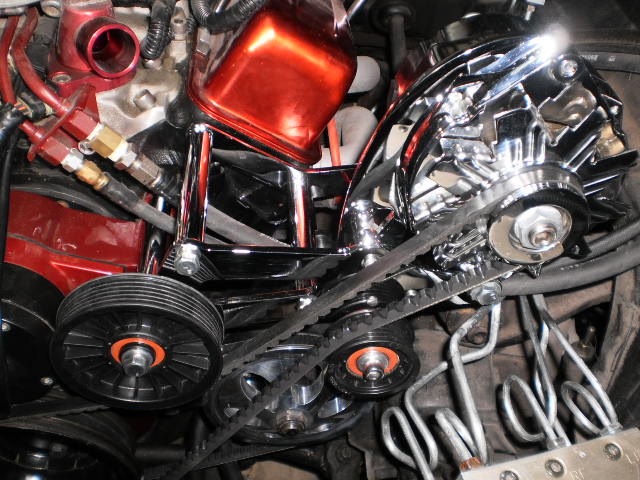
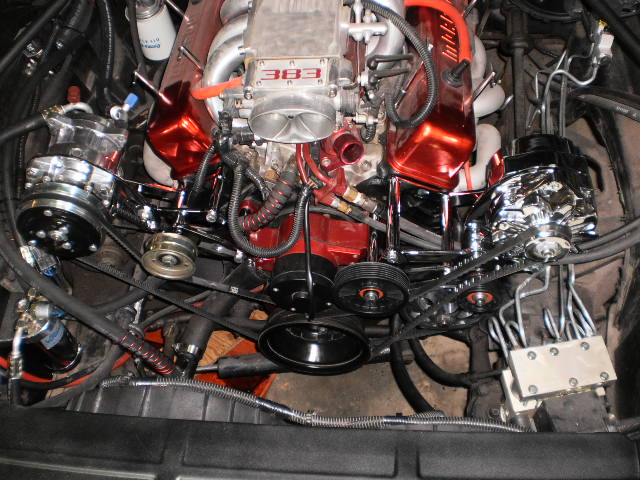
Shiny!
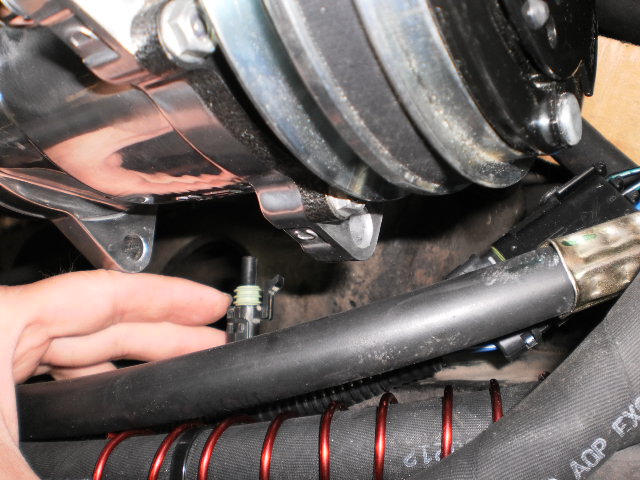
I connected all the hoses for what I hope to be the last time, and also the wiring harness to the trinary switch. However, I made sure to leave the actual connection to the compressor disconnected, since it should not be run until the system is being charged with refrigerant:
Since the alternator is now on the driver's side, I had to create a longer feed cable back to the battery -- it went from 4 feet to about 5 1/2 feet.
As an aside, I have seen many people claim you should use a 10ga feed wire. IMO this is grossly insufficient, especially with a 140 amp alternator. So I used 4ga, which might be overkill, but I wanted to make sure there was effectively no voltage drop.
Next is to reroute the upper radiator hose, intake ducting, and then refill the coolant. Should be ready to fire then.
thatfnthing- Donating Member
- Street Cred : 65
Re: Vintage Air Retrofit
![]() by ant7377 Wed Sep 26, 2012 10:23 pm
by ant7377 Wed Sep 26, 2012 10:23 pm

ant7377- G3GM Addict

- Street Cred : 36
Re: Vintage Air Retrofit
![]() by thatfnthing Wed Sep 26, 2012 10:53 pm
by thatfnthing Wed Sep 26, 2012 10:53 pm
Indeed, I never would have even known how critical it is if I hadn't stumbled into it, since it's never mentioned in any of the car rags that do A/C stories, and VA doesn't give it much press, either. Having opted for the rear-exit-style compressor, I was trying to do the initial mounting on the bracket, and I had one of the port caps off. I must have tilted it too much, and oil began to run out of the port.
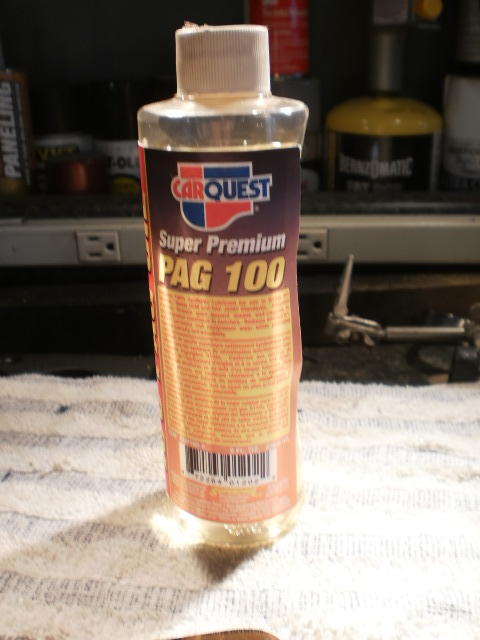
I called VA to find out what to do about it (if anything), and the rep told me it was critical to have the right amount of oil in the compressor -- 7.2 ounces of PAG 120 oil for the Sanden 508 compressor. He recommended I dump the remainder into a measuring cup to see what was left, and then refill the missing amount. However, he told me VA doesn't actually sell PAG oil, so I was on my own to find the stuff.
Well, after some research, it turns out you can't get 120, because they don't make it. It comes in viscosities of 46, 100, and 150 (although some documentation refers to an 80 grade also), which are measured based on 40*C temp. However, there is also a measurement scale based on 100*C, which are then referred to as SP-10, -15, and -20. Took a while to find a correlation between the two, because the stuff you can buy goes by the former scale, and the OEM specifications go by the latter. Turns out that SP 20 is essentially PAG 100, and that's what is recommended for the Sanden 508 by VA. (Note Sanden says 15 has replaced 20, but I'm going with what VA tells me.)
So I refilled the ounce I was missing through the top port on the compressor:
However, I learned a couple of very interesting, and important things along the way:
1. The oil should not be exposed to the atmosphere. It quickly absorbs the moisture from the air, and this will corrode parts in the A/C system.
2. The oil doesn't stay in the compressor -- it flows throughout the system and works in tandem with the refrigerant, and Sanden gives very specific formulas to determine how much oil should actually be used based on the total amount of refrigerant used. In light of that, it seems that 7.2 ounces is a ballpark number given by VA, and it should actually vary depending on the size of the condenser, the size of the evaporator, and the lengths of hose involved.
3. Since the oil flows throughout the system, the only time it's ever all in the compressor is when the system is brand new. Once charged, the oil will wind up in all the parts of the system, with a fair amount ending up in the drier. Sanden gives a chart that shows how much oil is expected to settle in the various system components, and this must be taken into account when replacing any part of the system in the future and the corresponding amount of oil must be added back in to replace what's lost from the old part.
For anyone who didn't already know this stuff (like me) and is planning to install or work on an A/C system, I highly recommend these for further reading:
Sanden SD service manual
A/C Lubricant Specifications
Sanden PAG oil specs
Also, here are some details from VA, which are poorly written and only briefly touch on the oil:
Vintage Air Basics
thatfnthing- Donating Member
- Street Cred : 65
Re: Vintage Air Retrofit
![]() by thatfnthing Mon Oct 01, 2012 12:21 pm
by thatfnthing Mon Oct 01, 2012 12:21 pm
ant7377 wrote:Looks great ! You really have some project there.
Thanks! Should be ready just in time to put it away for the winter!
thatfnthing- Donating Member
- Street Cred : 65
Re: Vintage Air Retrofit
![]() by thatfnthing Sun Nov 11, 2012 8:05 pm
by thatfnthing Sun Nov 11, 2012 8:05 pm

...but I am going to try to wrap it up in the next couple weeks. After getting the upper radiator hose connected and the intake back on:
I just have a couple things left to do:
1. Drain tube from evaporator through firewall
2. Rig up a new coolant reservoir
Then I'll be ready to take it to a local place to have it charged up. Photos of those items soon!
thatfnthing- Donating Member
- Street Cred : 65
Re: Vintage Air Retrofit
![]() by 77mali Sun Nov 11, 2012 9:38 pm
by 77mali Sun Nov 11, 2012 9:38 pm
Maybe next fall I'll be ready for my A/C. I can drive out there & have you hook it all up. I'll bring the beers & my checkbook

77mali- Donating Member
- Street Cred : 62
Re: Vintage Air Retrofit
![]() by thatfnthing Mon Nov 12, 2012 11:32 am
by thatfnthing Mon Nov 12, 2012 11:32 am
If you bring beers, though, nothing will get done.
thatfnthing- Donating Member
- Street Cred : 65
ant7377- G3GM Addict
- Street Cred : 36
Re: Vintage Air Retrofit
![]() by 77mali Mon Nov 12, 2012 9:06 pm
by 77mali Mon Nov 12, 2012 9:06 pm

77mali- Donating Member
- Street Cred : 62
Re: Vintage Air Retrofit
![]() by thatfnthing Tue Nov 13, 2012 9:09 am
by thatfnthing Tue Nov 13, 2012 9:09 am
Thanks! She's quite the handful at 12 weeks, but she loves to pose for photos. Hopefully she'll learn to lean into the turns like the last one.ant7377 wrote:Great dog!
I can see it through MA -- I was doing 80+ on I90 and a state cop came flying up behind me without his lights on. Turned out I was just in the way.77mali wrote:I made it from Boston to Buffalo in 6 hours flat once.

How'd you do it through NY, though? There's a trap about every 6 miles. I've driven in about half the states, and the only place I've seen as many traps is in IN.
thatfnthing- Donating Member
- Street Cred : 65
Re: Vintage Air Retrofit
![]() by 77mali Tue Nov 13, 2012 9:21 am
by 77mali Tue Nov 13, 2012 9:21 am
77mali- Donating Member
- Street Cred : 62
Re: Vintage Air Retrofit
![]() by Dubie Wed Nov 28, 2012 9:37 pm
by Dubie Wed Nov 28, 2012 9:37 pm
Dubie- G3GM Newbie

- Street Cred : 0
Re: Vintage Air Retrofit
![]() by thatfnthing Mon Dec 03, 2012 4:06 pm
by thatfnthing Mon Dec 03, 2012 4:06 pm
As for doing it again, yep. Now I know where the headaches are and what to do about them. And since I went seriously off-script with the mods, this should also represent a worst-case scenario. The driving factor is that I want to enjoy driving the car, which is something I couldn't do in too-hot or too-cold weather with no HVAC. So, faced with the same situation again, I'd do it all again.
thatfnthing- Donating Member
- Street Cred : 65
Re: Vintage Air Retrofit
![]() by thatfnthing Mon Dec 10, 2012 8:47 pm
by thatfnthing Mon Dec 10, 2012 8:47 pm
VA gives enough of the drain hose to reach the firewall (barely) and you're on your own after that. I used a brass elbow on the engine compartment side and clear 5/8" OD (1/2" ID) vinyl tubing downward.

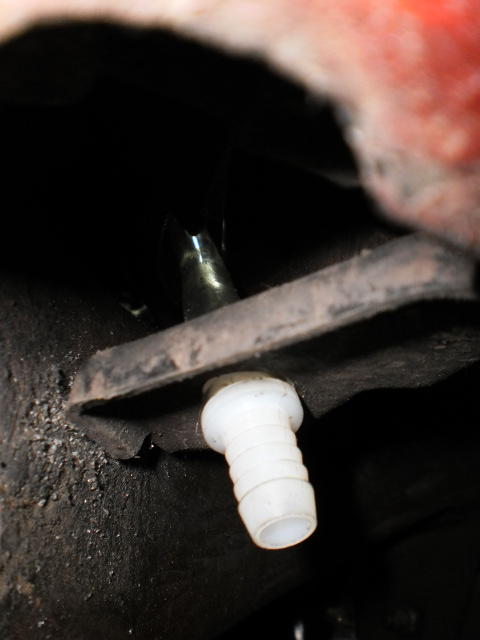
I didn't want the thing just flapping around down there, so I drilled a hole in the flat bottom of the inner fender and used a barbed plastic fitting for the exit.
Next up: coolant reservoir. Turns out the stock unit won't work anywhere, though it would have worked reversed on the driver's inner fender if the ABS modulator wasn't in the way. Had to go to the boneyard for something else and came home with a couple candidates. More soon!
thatfnthing- Donating Member
- Street Cred : 65
Re: Vintage Air Retrofit
![]() by Landonus Tue Dec 25, 2012 3:13 am
by Landonus Tue Dec 25, 2012 3:13 am

Landonus- Donating Member
- Street Cred : 5
Re: Vintage Air Retrofit
![]() by thatfnthing Wed Dec 26, 2012 8:35 pm
by thatfnthing Wed Dec 26, 2012 8:35 pm
Hindsight being 20/20, if my factory system had still worked, I probably would have stuck with it. On the upside, though, it's all more compact, self-contained, and lighter. Foot room is still good for size 10 or 11 shoe (see the first photo on page 1), but Shaq will have a problem.
Other than the work involved, the only real sacrifice is the glove compartment -- I'll put the door back for appearance sake, but there'll only be about 2 inches of actual space in there, so it's probably not even worth shortening the glovebox.
thatfnthing- Donating Member
- Street Cred : 65
Re: Vintage Air Retrofit
![]() by thatfnthing Mon Jan 21, 2013 10:30 pm
by thatfnthing Mon Jan 21, 2013 10:30 pm
As mentioned before, it had to get evicted from its original home on the passenger inner fenderwell in favor of the drier, and there was no room on the driver's fenderwell due to the ABS modulator and brake lines. So I had to figure something else out.
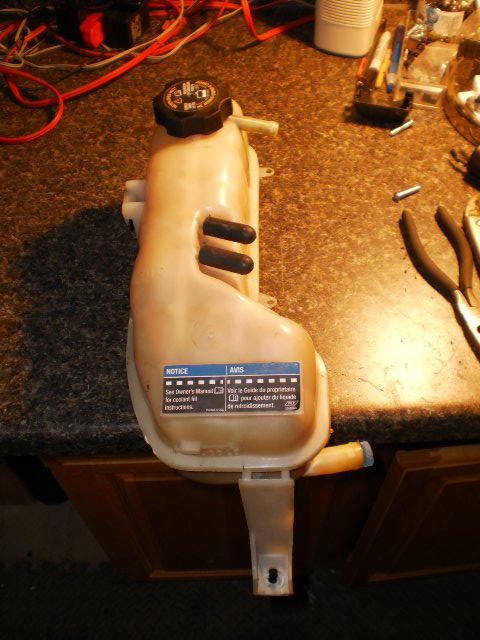
So off to the boneyard to look for a suitable replacement candidate. With as many shapes and sizes of reservoir as there are car models, I went armed with a general idea of the places under the hood I thought would work best, and their measurements. After a couple hours with the tape measure and a large cup of caffeine, I came back with a couple decent candidates, and once back settled on the one from a late 90's Grand Am:
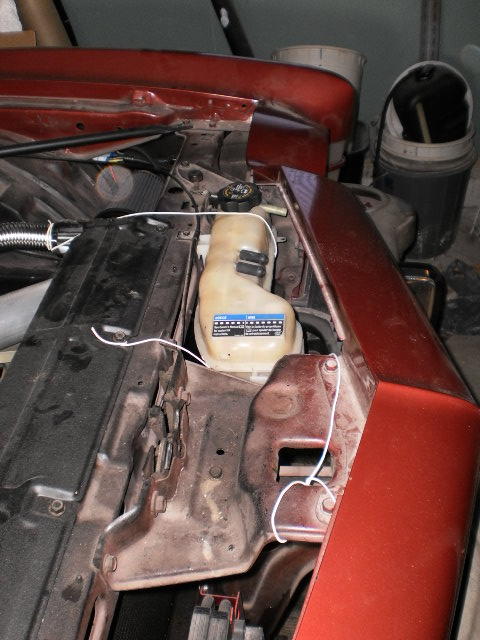
There were no good spots for it behind the radiator, so I figured I'd use some otherwise wasted space in front and mocked it up with some wire to hold it in place:
I had to fabricate a bracket for the clip along the radiator side that fastens to the hood release cable mount, and the large plastic "foot" on the end gets sliced off, inverted, and epoxied back on as a mounting tab to attach to the hood latch support. While I'm at it, the port on the bottom gets a barbed fitting epoxied into it for the feed hose from the radiator.
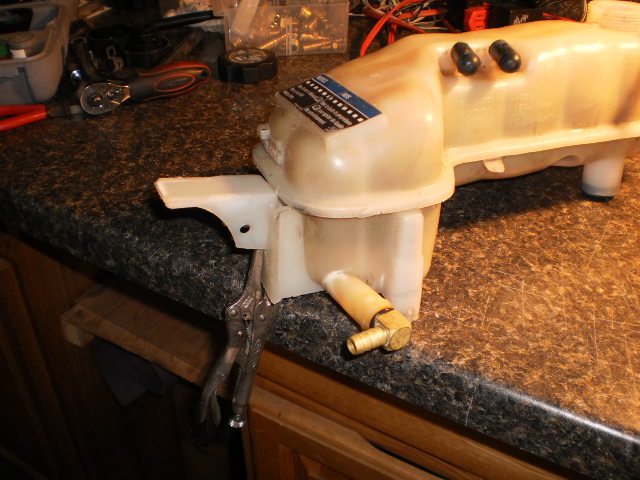
In the Grand Am, the reservoir is pressurized like the rest of the system. Not so in the Monte, so a pair of vise-grips and a screwdriver are used to pry the guts out of the cap.
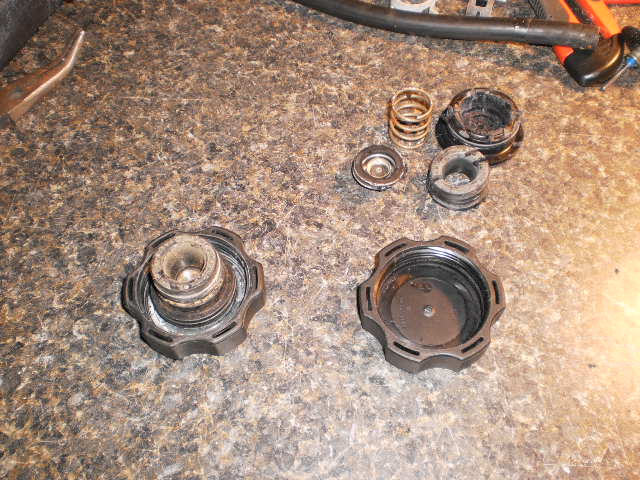
I discovered I'd pulled one with the optional coolant level sensor built in. Naturally I got a mini-brainstorm for later, so I just taped this off to protect it for now until I'm ready to wire that feature in.

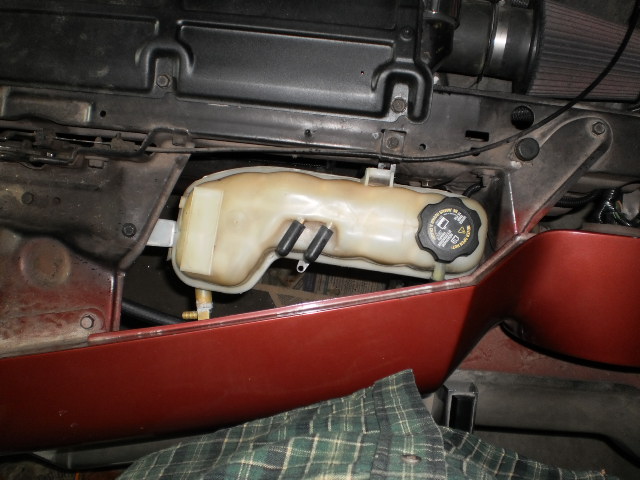
And here we are in place and ready for hose & coolant:
So as I mentioned, I'll get this thing charged in the spring and report back on the results, but for now it's essentially done. I think.
thatfnthing- Donating Member
- Street Cred : 65
Re: Vintage Air Retrofit
![]() by 77mali Mon Jan 21, 2013 10:35 pm
by 77mali Mon Jan 21, 2013 10:35 pm
77mali- Donating Member
- Street Cred : 62
Re: Vintage Air Retrofit
![]() by Evil ElCo Wed Sep 25, 2013 3:03 pm
by Evil ElCo Wed Sep 25, 2013 3:03 pm

Evil ElCo- Donating Member
- Street Cred : 1
Re: Vintage Air Retrofit
![]() by thatfnthing Thu Sep 26, 2013 9:50 am
by thatfnthing Thu Sep 26, 2013 9:50 am
thatfnthing- Donating Member
- Street Cred : 65
Re: Vintage Air Retrofit
![]() by 74Malibu383 Tue Jun 17, 2014 5:52 pm
by 74Malibu383 Tue Jun 17, 2014 5:52 pm

74Malibu383- Donating Member
- Street Cred : 26
Re: Vintage Air Retrofit
![]() by driveit Tue Jun 17, 2014 8:23 pm
by driveit Tue Jun 17, 2014 8:23 pm

driveit- Donating Member
- Street Cred : 15
Re: Vintage Air Retrofit
![]() by thatfnthing Wed Jun 18, 2014 12:03 pm
by thatfnthing Wed Jun 18, 2014 12:03 pm
74Malibu383 wrote:Did you ever get this charged and working?
Everything's hooked up, and vent/heat work great and the blower blows where and how fast I tell it to, but alas, I have not been able to find the whole weekday it will take to get the thing charged, so I have not run the compressor yet (though I did test all the electrical on the A/C side so it's ready to go). That's still the plan for this summer (much like it was last summer when I finished it), but in another week I am on another business trip again. I can't even find the time to install the NOS front bumper that's still sitting wrapped in its original factory coating.
driveit wrote:I just went over this thread and all I can say is wow... I would just look it and say this isn't going to work. Now where can I get the cash to pay someone who knows what they are doing to fix this? After reading this I think I will be getting in touch with you. Amazed I am!
If I could find the time, I'd say c'mon over, 'cuz Mali's bringing beers if I recall correctly.
thatfnthing- Donating Member
- Street Cred : 65
Re: Vintage Air Retrofit
![]() by 77mali Wed Jun 18, 2014 12:21 pm
by 77mali Wed Jun 18, 2014 12:21 pm
77mali- Donating Member
- Street Cred : 62
Page 3 of 4 • 1, 2, 3, 4 ![]()


|
|
|
» Dash Solutions
» Anyone good at photoshop?
» '77 Monte Carlo Landau - Parting out - 61k miles on car
» 1973 4 door laguna frame same as 1973 2 door chevelle
» Dash assembly for 73-77 Malibu/Monte/El Camino,etc.
» Window louvers
» 1973 Chevelle SS 1 Family
» 1973 Chevelle SS, 350, 4spd. build
» Who works on 73-77 "soft" steering wheels?