


Fender removal and replacement
+2
Iggy
dhw3971
6 posters

Fender removal and replacement
![]() by dhw3971 Mon May 01, 2023 9:29 am
by dhw3971 Mon May 01, 2023 9:29 am
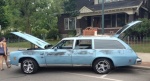
In September of last year I was lucky to find a NOS driver-side fender at a swap meet. After a sandblast and prime it's nearly ready to replace the original fender.
However, I have never removed a fender before and I'm curious what type of pain I'm in for if I take on this job. There's nothing wrong with (well, that I can see from the outside) the current piece and I'm wondering if this is a "if it ain't broke, don't fix it" situation. After the struggle involved with replacing all four doors--even with help from a pro--I can see this turning into a P.I.T.A.....panel gaps, shims, cursing, etcetera.
If I had located a driver-side fender I'd feel more committed to the job as that one does have a rust hole.
dhw3971- Donating Member

- Street Cred : 3
Re: Fender removal and replacement
![]() by Iggy Mon May 01, 2023 10:32 am
by Iggy Mon May 01, 2023 10:32 am
Dave, I have not removed a fender on a G3, but have done so on square body trucks. You will be amazed by the hidden bolts, just when you think they are all out, there is still another one holding something together! Did I mention you have to remove the door to get at all the fender bolts?
Not as bad as it sounds - but it does take some patients! On the trucks, I start by removing the inner fender as it is bolted to not only the fender, but also the core support. The core support is where the hidden bolts were connecting to the fender. Also on the trucks the door hides the rear fender bolts so the doors needed to be removed to remove the fenders.
Not as bad as it sounds - but it does take some patients! On the trucks, I start by removing the inner fender as it is bolted to not only the fender, but also the core support. The core support is where the hidden bolts were connecting to the fender. Also on the trucks the door hides the rear fender bolts so the doors needed to be removed to remove the fenders.

Iggy- G3GM Member

- Street Cred : 15
Re: Fender removal and replacement
![]() by dhw3971 Mon May 01, 2023 10:39 am
by dhw3971 Mon May 01, 2023 10:39 am
ugh! remove the door?? bleah! the doors were difficult enough to hang and align; I sure don't want to do that again!
Maybe I'll just paint this fender and keep it safe in the basement...when I find a passenger side I'll start thinking seriously about the project.
Maybe I'll just paint this fender and keep it safe in the basement...when I find a passenger side I'll start thinking seriously about the project.
dhw3971- Donating Member
- Street Cred : 3
Re: Fender removal and replacement
![]() by Limey SE Mon May 01, 2023 10:41 am
by Limey SE Mon May 01, 2023 10:41 am
I dont recall having to take door off for fender but its been a decade since I have done it So maybe ??
___________________________________________
1977 Chevelle SE x2
One Mild original
one Wild NON original
Anthony

Limey SE- Management

- Street Cred : 97
Re: Fender removal and replacement
![]() by bracketchev1221 Mon May 01, 2023 2:40 pm
by bracketchev1221 Mon May 01, 2023 2:40 pm
I think there is a bolt that requires the door be open to get to, but I don't think you have to take the door off.
bracketchev1221- G3GM Enthusiast

- Street Cred : 15
Re: Fender removal and replacement
![]() by zucchi Mon May 01, 2023 4:46 pm
by zucchi Mon May 01, 2023 4:46 pm
I replaced all the sheet metal on the front of my Monte Carlo ~30 years ago. Unless you have mad engineering skills with pullies, braces, etc, you'll need at least one helper and some beers (or whatever refreshments your helper favors). The hood should be completely removed because the hinges are attached to the fenders. Since you're only doing one fender, you may be able to get away with propping up the hood on that side only but I very much discourage you from taking that approach. If whatever you use to prop up the hood fails, you could end up with scratched paint, damaged trip, one very bent hinge and a broken windshield.
Like Iggy said, there are bolts and screws in places where you can't help but to ponder how they put this together at the factory. There are also wires for lights. Be real careful with the plastic wheel-well; at nearly 50-years old, they're about as fragile as eggshells. Take your time and be gentle. Take LOTS of photos and video as you take everything appart so as to have a guide to put it all back together. You'll discover extra holes and wonder if you forgot something. Detailed documenting during disassembly will prevent that sort of panic during reassembly.
Like Iggy said, there are bolts and screws in places where you can't help but to ponder how they put this together at the factory. There are also wires for lights. Be real careful with the plastic wheel-well; at nearly 50-years old, they're about as fragile as eggshells. Take your time and be gentle. Take LOTS of photos and video as you take everything appart so as to have a guide to put it all back together. You'll discover extra holes and wonder if you forgot something. Detailed documenting during disassembly will prevent that sort of panic during reassembly.

zucchi- G3GM Member
- Street Cred : 4
Limey SE likes this post
Re: Fender removal and replacement
![]() by Joe73 Mon May 01, 2023 8:19 pm
by Joe73 Mon May 01, 2023 8:19 pm
Changing out the fender is not a big deal at all. I would be easiest to remove the hood first but as stated above, you can just prop it up.
Digging deep in to the memory bank, so here goes. Unless something has been changed, all the bolts are 9/16" with the exception of the 4 on the rad support which are 1/2" and you will need a 1/2" deep socket for the headlight extensions "self threading" nuts. Also, keep track of any shims that fall out and put them back where you got them from. Should keep you in the alignment ballpark.
1. Take out all the 1/2" bolts around the wheel well lip.
2. Open the door, at the bottom of the door to fender gap, horizontally, is a bolt.
3. Then directly below that one, vertically, on the bottom facing up is another bolt.
4. Remove the hood hinge bolts (2).
5. At the rear of the hood hinge are two more bolts, top of firewall at the base of the windshield and one on the face of the firewall right behind the hood hinge.
6. Up front, reach in to the edge of the rad support, should be two 1/2", horizontal, bolts. They are short bolts.
7. Further into the fender pocket where you just removed the two short bolts are the self threading nuts for the headlight extension. I think its three total. You might want to leave it on the fender and remove it together. If so, just unbolt the extension from the center header panel piece.
8. If the car is completely original there should be a short support rod from the front, bottom, edge of the wheel well lip. The support extends to the bottom of the rad support. Just take the one 1/2" bolt out of the wheel well lip.
Its really not a bad job at all. If you have a cordless or air ratchet, I cant see it taking more than about 20 min. to get it off.
Good luck with it.

Joe73- Donating Member
- Street Cred : 83
Limey SE, TW Monte and 76Chevelle2Tone like this post


Permissions in this forum:
You cannot reply to topics in this forum|
|
|
» Rusty's progress motor Parts arrived LOL Half are on
» door interior trim retainer clips
» Painting Interior Plastic
» Anyone good at photoshop?
» El Camino/Sprint LH Aftermarket Quarter Panel FOR SALE
» 1973 chevelle four speed console
» dashes
» Used OEM Hood 73-77
» 76 Laguna parked in 2002